
Quicksuite Knowledge Base Get Support 24/7
Food Quicksuite
Join us on this exploration of the Food Feature, where precision meets innovation, and the financial pulse of our super app resonates with the evolving demands of our diverse user base. Food Delivery Feature is a comprehensive tool meticulously crafted to elevate the dining experience for users while empowering administrators with precise control over the entire food delivery ecosystem. It seamlessly integrates the culinary desires of users with the operational excellence of our super app, fostering a harmonious environment where choice, convenience, and quality converge.
In the Food Module, we have the first feature of Cuisine Types
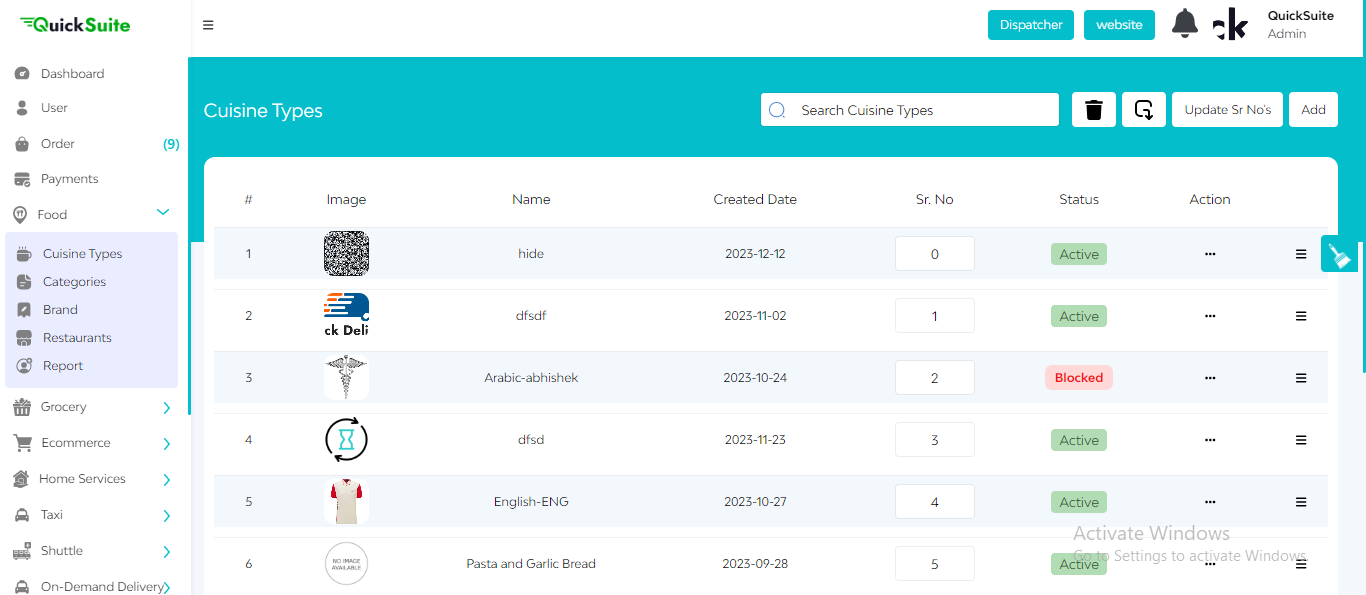
- In the cuisine feature, the admin will be able to see a search bar that can help the admin search for a specific cuisine type.
- Alongside the search bar, a bin icon is present which is an option for deleting a cuisine type. The admin can also import and export cuisine types from a CSV file.
- The admin can also update the serial numbers of cuisine types using the update serial number button. To add more cuisine types to the already existing list of cuisine types, click on the add button. The admin will be required to add the name and image of the cuisine type.
The admin will be able to see various details of a particular cuisine type like its image and its name. The created date refers to the date on which the cuisine type was created in the admin dashboard. The status tab represents whether a cuisine type is active or blocked. The admin can change the status of a cuisine from active to blocked and vice-versa.
In the action tab, the admin can edit or delete a particular cuisine type. Alongside the action tab, the drag and drop option is available, which helps the admin to drag a particular cuisine type and change its serial number.
Let’s proceed to the Categories Feature
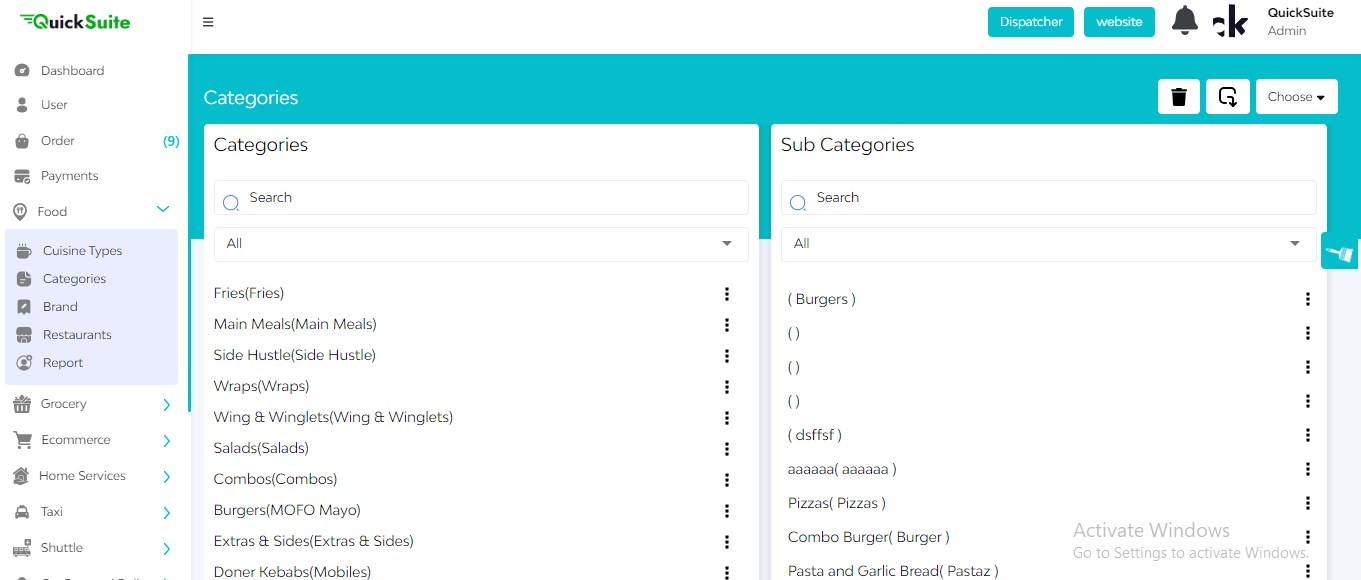
- In the categories feature, the admin will be able to see categories along with subcategories.
- In the top right corner, you can see a search bar that helps the admin search for categories as well as subcategories in the existing list.
- On clicking a specific category, the admin will be able to view the subcategories of that particular category. The admin can also edit or block a particular category.
- Alongside the search bar, a bin icon is also present that will help the admin to delete a particular category or all categories at once. The admin can also import or export categories from a CSV file.
- Just right by this import-export button, a choose button is also available that helps the admin to add a category or a subcategory. The admin will be required to mention the cuisine type, category name, and image to add a particular category.
Now we move on to the Restaurant Feature
- On clicking on the restaurant feature, the admin can see the 2 main tabs restaurant and pending restaurants. The pending restaurant tab lists those restaurants whose onboarding requests are pending approval.
- Under the restaurant tab, all impaneled restaurants are listed with details like their name, image, rating, and others that are added at the time of restaurant registration to the panel.
- The document status represents the approval status of the documents submitted by the restaurant owner.
- The type section indicates the restaurant type based on the cuisine. The restaurant ID refers to a unique ID given to a specific restaurant.
- The product tab represents the number of products offered by the restaurant. The admin can also add products on merchant request.
- The status tab represents whether a restaurant is active or blocked from serving and the admin can control the same.
- The created date tab refers to the date on which the restaurant was added to the panel.
The 3 dots sign is for the action by the admin to edit restaurant details that contain information related to restaurant name & location, delivery details, bank details, operating hours & holiday lot if any.
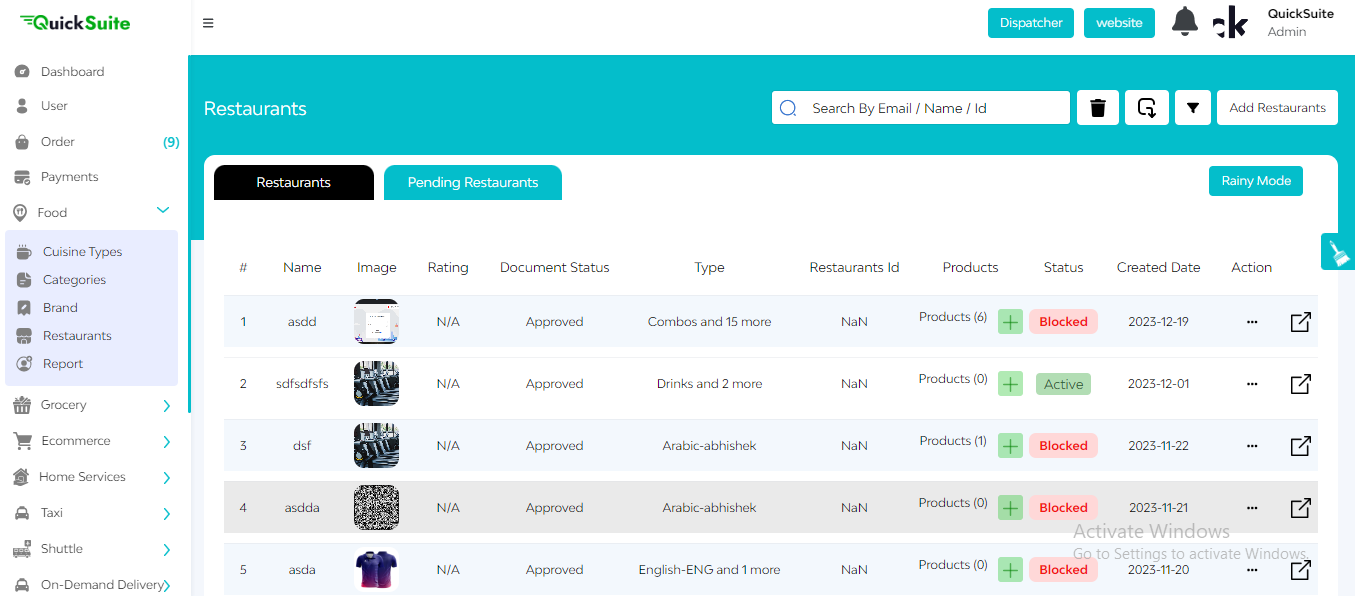
Admin can also see outlets, delete any restaurant, and view ratings & reviews. All these come under the action tab.
Next to the 3 dots action icon is a redirection icon, Clicking on this takes the admin to the merchant panel.
A search bar is present on the top right corner that helps the admin to search for a restaurant using its name, email, and restaurant ID. Alongside the search bar, a bin icon is present that allows the admin to delete a particular restaurant or all the restaurants at once.
The admin can also import or export restaurants in CSV file format. The filter button can help the admin filter the restaurants based on various criteria like reviews, maximum delivery time, minimum delivery time, item quality, and blocked restaurants.
To add a new restaurant, click on the add restaurant button. In the next step, the admin will be required to add details like personal details of the restaurant, delivery options, bank details of the merchant, and operating hours of the restaurant. After the admin is done adding the details, click on the add button to submit the details.
A rainy mode button is present below the add restaurant button which helps the admin to switch the merchants off temporarily. This change will be reflected in the customer app.
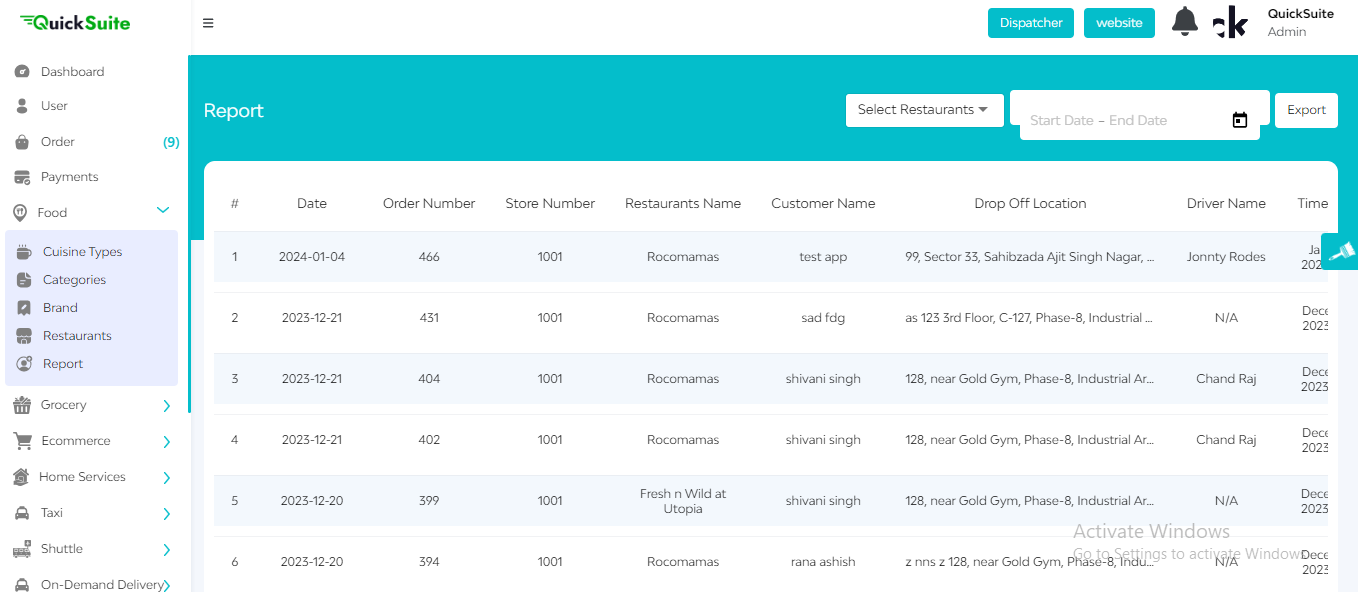
Next, we move to the Report Feature
- In the report feature, you can see a filter of date which can help you to find orders according to a particular date. Alongside the date filter, you can see an export button that can help the admin to export the report file in an Excel file format.
- The date section tells you the particular date on which the order is placed. Order number refers to the serial number of the order placed.
- The restaurant’s name denotes the name of the restaurant from which the order is placed.
- Customer details such as their name and delivery address are also given.
- The report feature also includes the name of the driver delivering the order.
- Other order details such as the creation time of the order and the time at which the order is accepted are also given.
- Collection Time refers to the time taken by the driver to pick up the order and Wait Duration is the amount of time for which the driver had to wait at the pickup location.
Pickup Time is the time at which the order is picked up by the driver whereas Delivery Duration denotes the time taken by the driver to deliver the order. The admin can also see the time at which the order is delivered. Total distance per trip shows the amount of distance traveled by the driver to deliver the order. Order amount denotes the total billed amount of the order.
This feature goes beyond traditional food delivery platforms. It’s not just a conduit for delivering meals; it’s a gateway to a diverse culinary world within our super app. Administrators, armed with the Food Delivery Feature, navigate through a suite of functionalities that ensure a delightful journey for users – from personalized menu exploration to efficient order management, all the way to ensuring timely and accurate deliveries.