
Quicksuite Knowledge Base Get Support 24/7
E-commerce
Explore the E-Commerce Module of Our Multi-Service Admin Panel
In the ever-evolving landscape of e-commerce, Quicksuite emerges as a powerhouse, redefining the way businesses manage and scale their online retail operations. Unleash the potential of your digital storefront with a comprehensive suite of tools designed to streamline processes, enhance customer experiences, and maximize sales.
Effortlessly manage your product catalog with intuitive tools. Add, edit, or remove products, control inventory levels, and categorize items for a seamless browsing experience. From purchase to delivery, our module simplifies the order fulfillment process. Admins can track orders in real-time, update statuses, and provide customers with accurate delivery information.
Discover the next level of e-commerce management. Quicksuite isn’t just a tool; it’s a strategic partner in your digital retail success story. Whether you’re a budding entrepreneur or an established brand, our solution is the key to unlocking unparalleled growth and customer satisfaction.
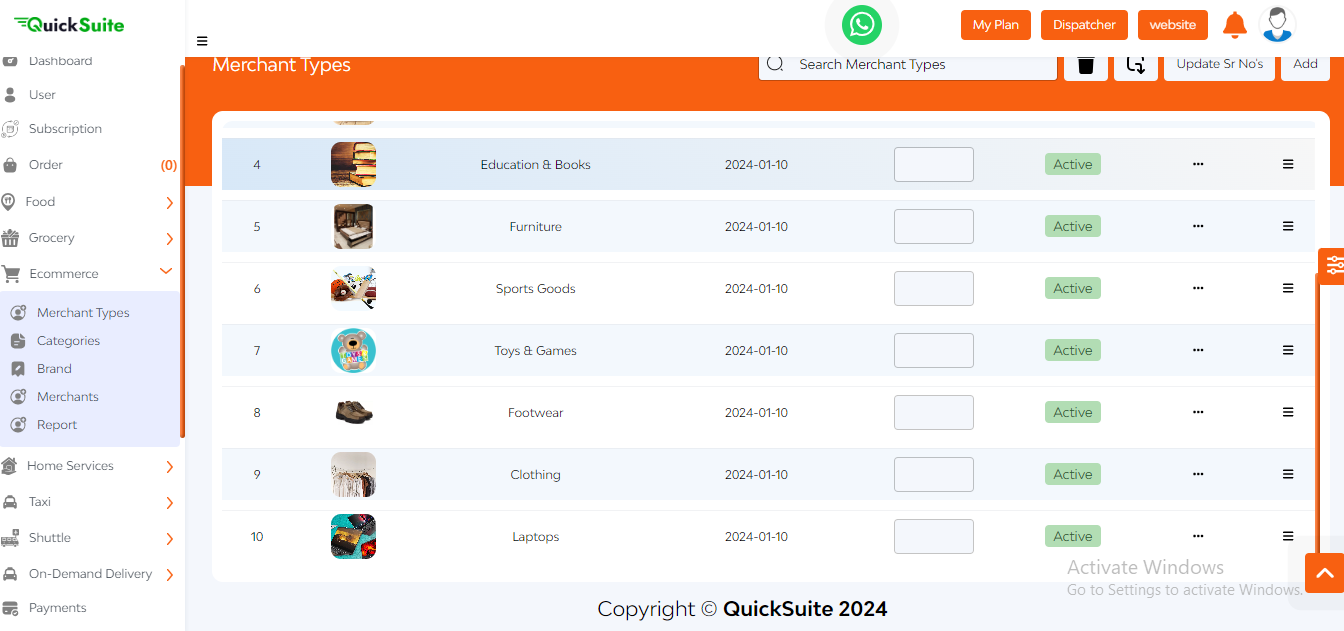
Firstly, we have the feature of Merchant Type
- In the merchant types feature of the e-commerce module, the admin can see various details like the image and the name of the merchant type.
- The admin can also see the created date and the serial number of merchant types, alongside which the status tab is present which represents whether the merchant is active or blocked from delivering things to the customers.
- The admin can also edit or delete a particular merchant type using the action tab.
- The admin can also drag and adjust the position of a merchant type using the button present on the right side of the action tab.
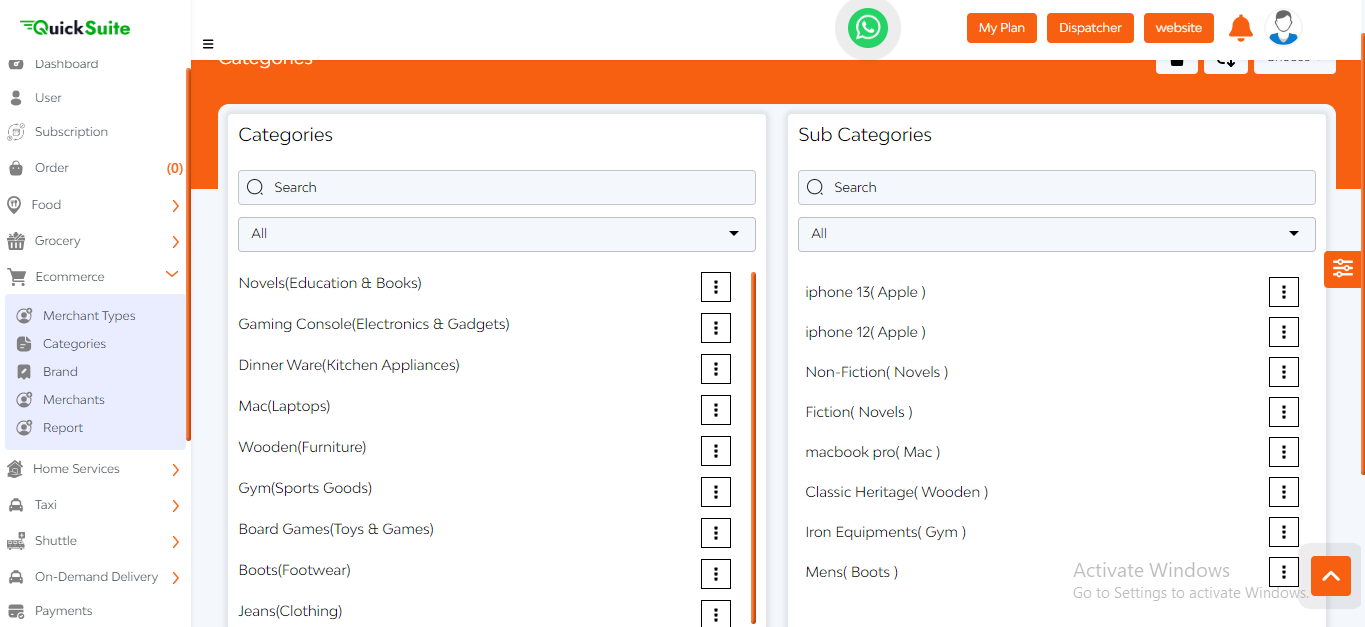
Let’s proceed to the Categories Feature
- In the categories feature, the admin will be able to see categories along with subcategories.
- In the top right corner, you can see a search bar that helps the admin search for categories as well as subcategories in the existing list.
- On clicking a specific category, the admin will be able to view the subcategories of that particular category. The admin can also edit or block a particular category.
- Alongside the search bar, a bin icon is also present that will help the admin to delete a particular category or all categories at once. The admin can also import or export categories from a CSV file.
- Just right by this import-export button, a choose button is also available that helps the admin to add a category or a subcategory. The admin will be required to mention the cuisine type, category name, and image to add a particular category.
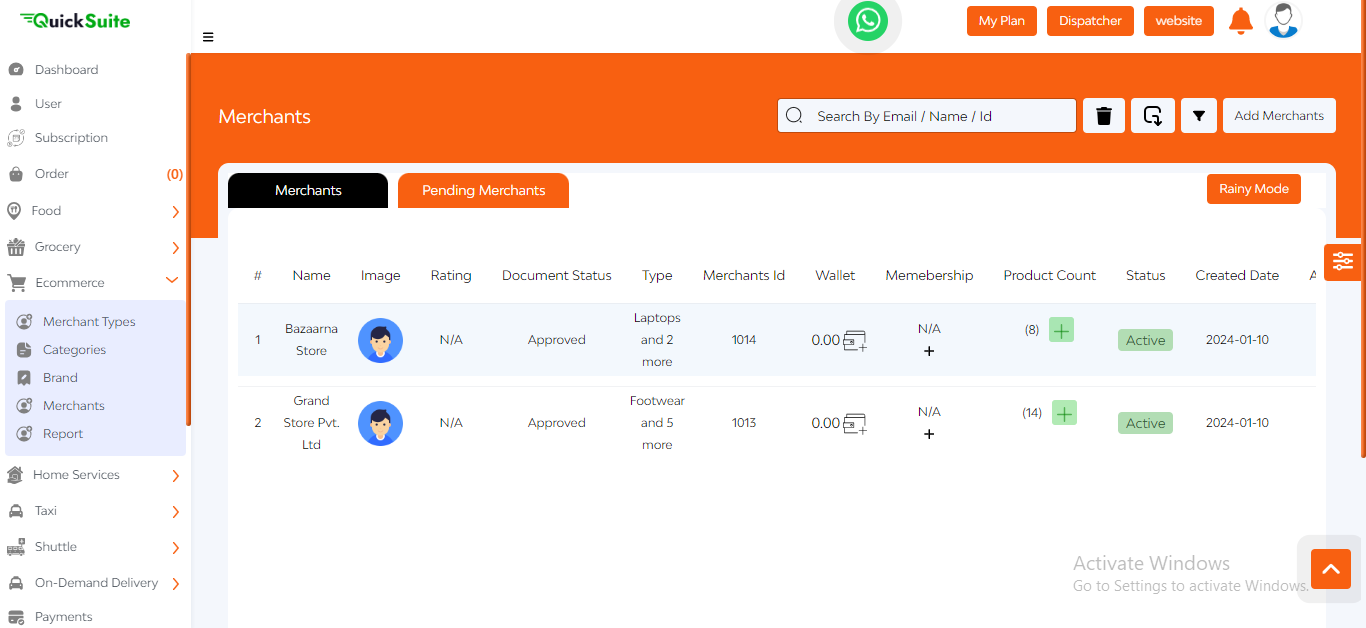
Now we move on to the Merchant Feature
On clicking on the Merchant feature, the admin can see the 2 main tabs Merchant and Pending Merchants. The pending Merchant tab lists those Merchants whose onboarding requests are pending approval.
Under the Merchant tab, all impaneled Merchants are listed with details like their name, image, rating, and others that are added at the time of Merchant registration to the panel.
- The document status represents the approval status of the documents submitted by the Merchant.
- The type section indicates the Merchant type.
- The Merchant ID refers to a unique ID given to a specific Merchant.
- The product tab represents the number of products offered by the Merchant. The admin can also add products on merchant request.
- The status tab represents whether a Merchant is active or blocked from serving and the admin can control the same.
- The created date tab refers to the date on which the Merchant was added to the panel.
- The 3 dots sign is for the action by the admin to edit Merchant details that contain information related to Merchant name & location, delivery details, bank details, operating hours & holiday lot if any.
- Admin can also see outlets, delete any Merchant, and view ratings & reviews. All these come under the action tab.
- Next to the 3 dots action icon is a redirection icon, Clicking on this takes the admin to the merchant panel.
- A search bar is present on the top right corner that helps the admin to search for a Merchant using its name, email, and Merchant ID.
- Alongside the search bar, a bin icon is present that allows the admin to delete a particular Merchant or all the Merchants at once.
- The admin can also import or export Merchants in CSV file format. The filter button can help the admin filter the Merchants based on various criteria like reviews, maximum delivery time, minimum delivery time, item quality, and blocked Merchants.
To add a new Merchant, click on the Add Merchants button. In the next step, the admin will be required to add details like personal details of the Merchant, delivery options, bank details of the merchant, and operating hours of the Merchant. After you are done adding the details, click on the add button to submit the details.
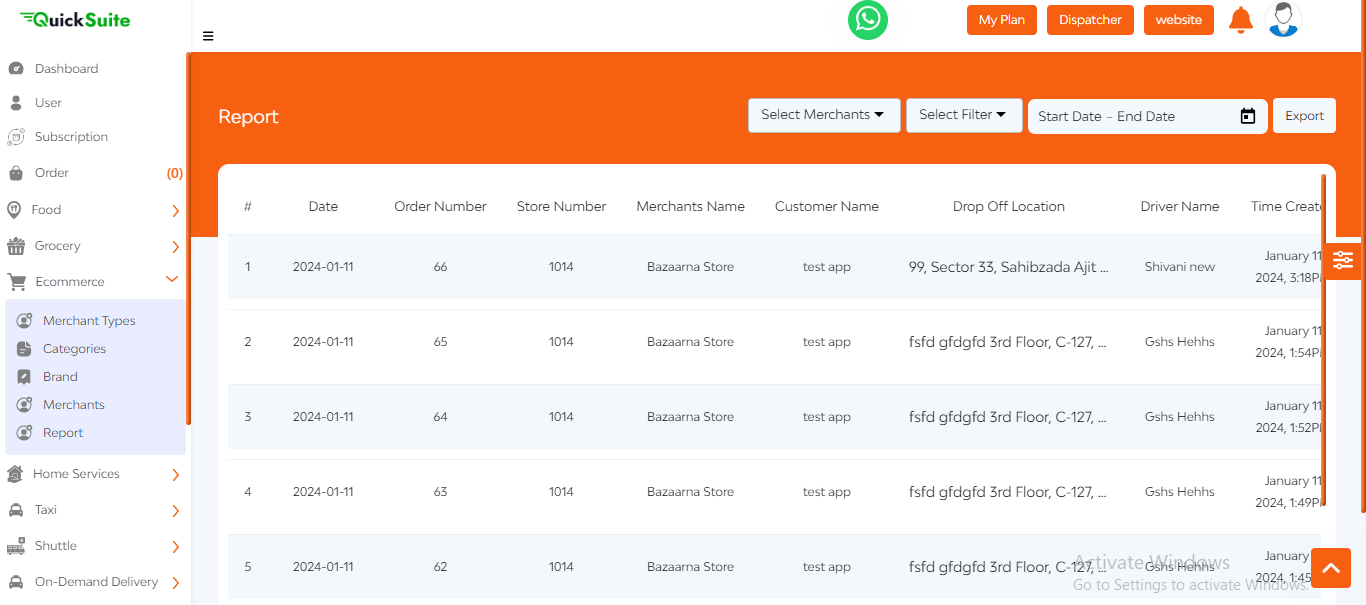
In the report feature, you can see a filter of date which can help you to find orders according to a particular date. Alongside the date filter, you can see an export button that can help the admin to export the report file in an Excel file format.
- The date section tells you the particular date on which the order is placed. Order number refers to the serial number of the order placed.
- The restaurant’s name denotes the name of the restaurant from which the order is placed.
- Customer details such as their name and delivery address are also given.
- The report feature also includes the name of the driver delivering the order.
- Other order details such as the creation time of the order and the time at which the order is accepted are also given.
- Collection Time refers to the time taken by the driver to pick up the order and Wait Duration is the amount of time for which the driver had to wait at the pickup location.
- Pickup Time is the time at which the order is picked up by the driver whereas Delivery Duration denotes the time taken by the driver to deliver the order.
The admin can also see the time at which the order is delivered. Total distance per trip shows the amount of distance traveled by the driver to deliver the order. Order amount denotes the total billed amount of the order.