Chat with us, powered by LiveChat

QuickGrocery Get Support 24/7

Order

Managing all your platform’s orders is simple and intuitive with the Orders section.

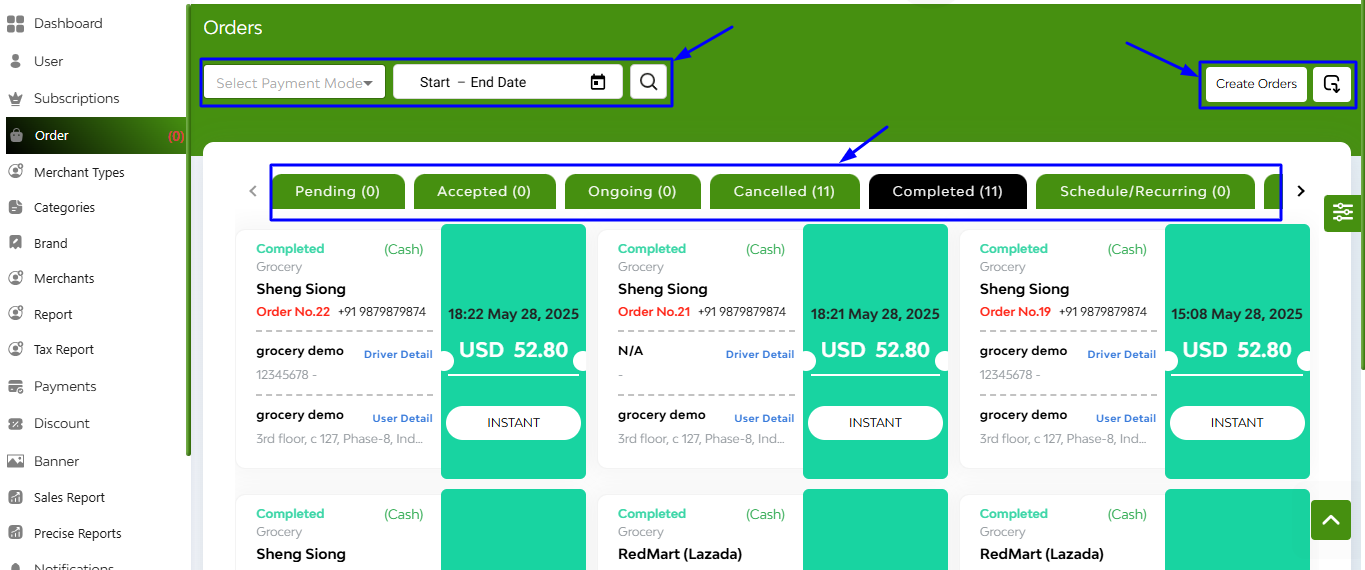
At the top-left corner of the Orders interface, you’ll see three filter tools that help refine your order view:

Payment Mode Filter (Card, Cash, Google Pay, Apple Pay,Wallet)
Date Range Selector
Search Bar

On the right corner, you’ll find two important action buttons:

1. Create Order: Tapping this opens a pop-up form where you can manually create a new order by filling in:

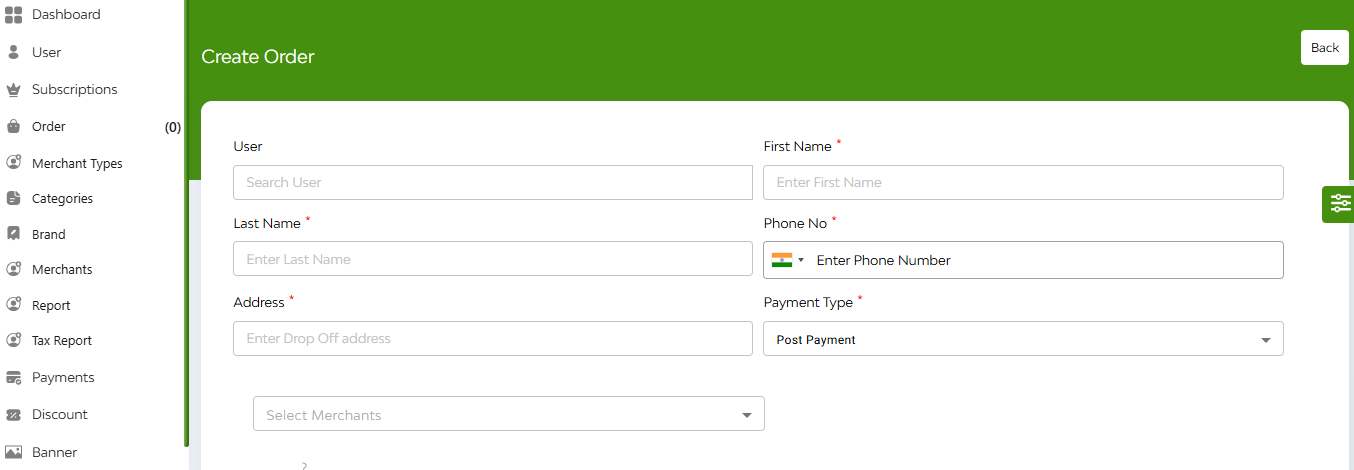
  • User Details: Name, Phone Number, Address
  • Payment Type: Choose from available options
  • Select Merchant
  • Hit Save to submit the new order.

2. Export Button: Use this to download order data for reporting or analysis.

Below the filter and action bar, you’ll find multiple order status tabs. These help you track orders by their current state: Pending, Accepted, Ongoing, Cancelled, Completed, Scheduled/Recurring, All

Tapping any of these tabs reveals a grid of order cards, each showing summarized order information.

Each order card provides a quick-glance glance of key order details:

  • Order Status (Pending, Accepted, etc.)
  • Payment Mode
  • Restaurant Brand
  • Order Number
  • Customer Mobile Number
  • Driver Details (Name, Phone)
  • User Details

You’ll also find a flash card inside each order tile, highlighting:

  • Order Time
  • Order Date
  • Total Amount

Driver Details – Expanded View

If you tap on Driver Details within any order card, a detailed interface slides out from the corner, displaying comprehensive order and delivery info:
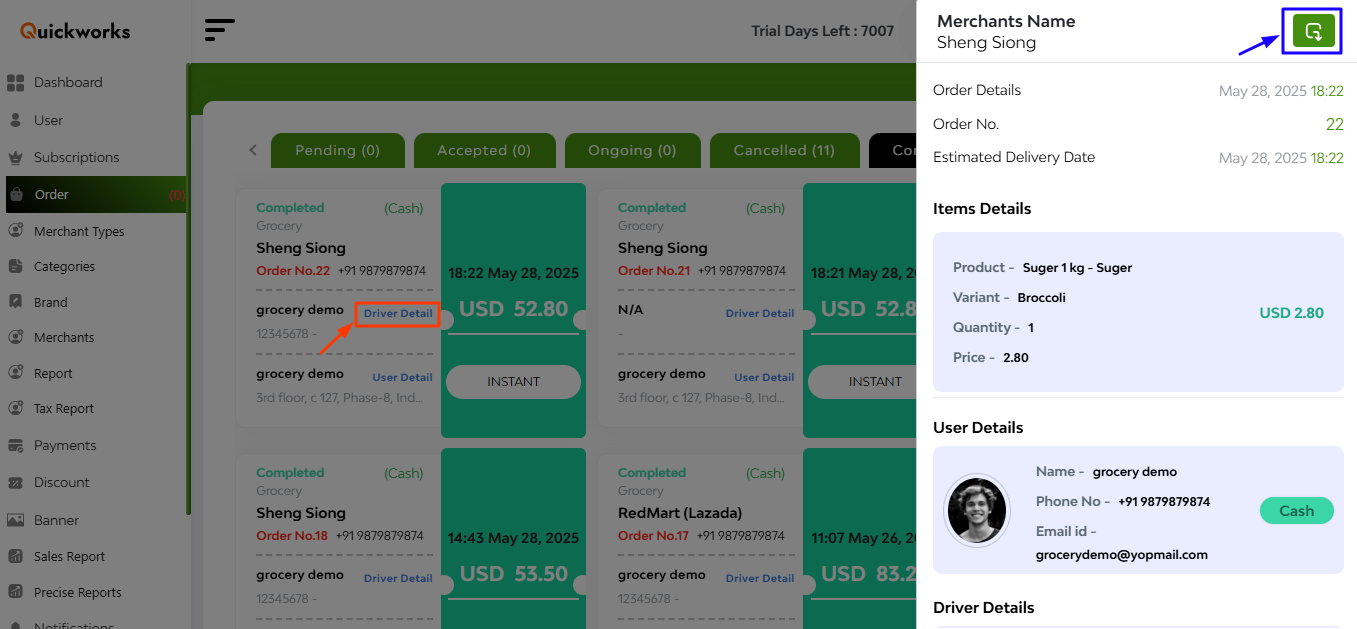
  • Restaurant Name
  • Order Number
  • Estimated Delivery Time
  • Itemized Order List
  • Add-Ons
  • User & Driver Details (Name, Phone, Email)
  • Pickup Address
  • Delivery Address
  • Total Amount Breakdown

You can also export that data.

FAQ's

The order section shows all orders placed on the platform — whether by users directly or created manually by the admin.
It helps the admin track, review, and manage every order with full details including status, customer info, merchant, products, and payment method.

  • Pending: Order just placed by the user, waiting for acceptance by merchant or admin.
  • Accepted: Order has been approved and is ready to be processed.
  • Ongoing: Order is being prepared or delivered.
  • Canceled: Order was canceled for any reason (by user, merchant, or admin).
  • Completed: Order has been successfully delivered to the user.
  • Scheduled/Recurring: Order is set to be delivered at a future date/time or repeats on a schedule.
  • All: Shows every order ever placed, regardless of status.

  • New order starts as Pending.
  • Once accepted, it appears under Accepted.
  • When preparation/delivery starts, it becomes Ongoing.
  • If it’s delivered, it moves to Completed.
  • If canceled at any stage, it moves to Canceled.
  • If scheduled, it shows under Scheduled until processing.

Each order card shows:

  • Current order status
  • Store type selected by user
  • Order number and user’s phone number
  • Driver details (name and address)
  • User details (name and delivery address)
  • Order timestamp and date
  • Total amount
  • Order type (instant or scheduled)

This helps the admin monitor and review each order in detail.

The admin can use:

  • Payment type filter: View only cash or card orders.
  • Date range filter: Show orders placed within specific dates.
  • Search bar: Find orders by keyword (e.g., username, store name, order number).

These filters make it easy to analyze orders based on specific criteria.

Admins can manually place orders on behalf of customers.
Useful if:

  • Orders come via phone, WhatsApp, or outside the app.
  • Admin wants to correct an order.
  • Testing or demo orders.

The admin fills:

  • User first name, last name, phone number, address
  • Payment type (post-payment or not)
  • Merchant type and outlet
  • Selects products and quantity
  • Can apply discount (percentage or currency)
  • Add extra charges if needed
  • Choose instant or scheduled delivery
  • Confirm and click create

It directly appears under Accepted (since it was placed by admin, it skips pending approval).

Yes. When creating an order, the admin can set it as scheduled and choose date & time.
It then appears in the Scheduled section until processing starts.

Canceled orders appear in the Canceled section, with all the same details and timestamp for audit or review.

It moves to the Completed section. The admin can still view all details, including delivery info and final amount.

The All section helps the admin see the entire order history of the platform — useful for reports, audits, or business analysis.

The card format keeps key info visible at a glance — status, amount, customer, merchant, driver — so the admin can quickly review large numbers of orders.

Yes. Each order shows driver name & address, and the selected merchant type & outlet.

It helps admins track:

  • Daily/weekly sales
  • Monthly order trends
  • Seasonal spikes

And compare periods for business insights.

While creating orders, admins can:

  • Add discount as a currency value or percentage.
  • Apply additional charges manually.

All appear in the final summary before creating the order.

No. Manual orders created in the admin panel are auto-approved and go straight to the Accepted stage.