Chat with us, powered by LiveChat

QuickGrocery Get Support 24/7

Discount

The Discount feature enables admins to create, manage, and track promotional coupons to drive user engagement and boost order.

Coupon Table Breakdown

Upon accessing the Discount section, administrators are presented with a detailed list of existing coupons, each displaying the following information:

  • Coupon Image & Name:
  • Coupon Code: A Unique Code users must enter to redeem the discount.
  • User Count: Number of users who have successfully used the coupon.
  • Discount Tab: Displays the type (percentage/fixed) and value of the discount.
  • Description: A short note or label added during coupon creation.
  • Start & End Date: Defines the validity period of the coupon.
  • Status: Shows whether the coupon is Active or Blocked. Admins can toggle this.
  • Action Tab: Options to Edit or Delete the coupon.

There is a search bar located at the top right corner, allowing admins to search for specific coupons by entering relevant codes. Besides that “Add Coupon” button is there.

+Add Coupon
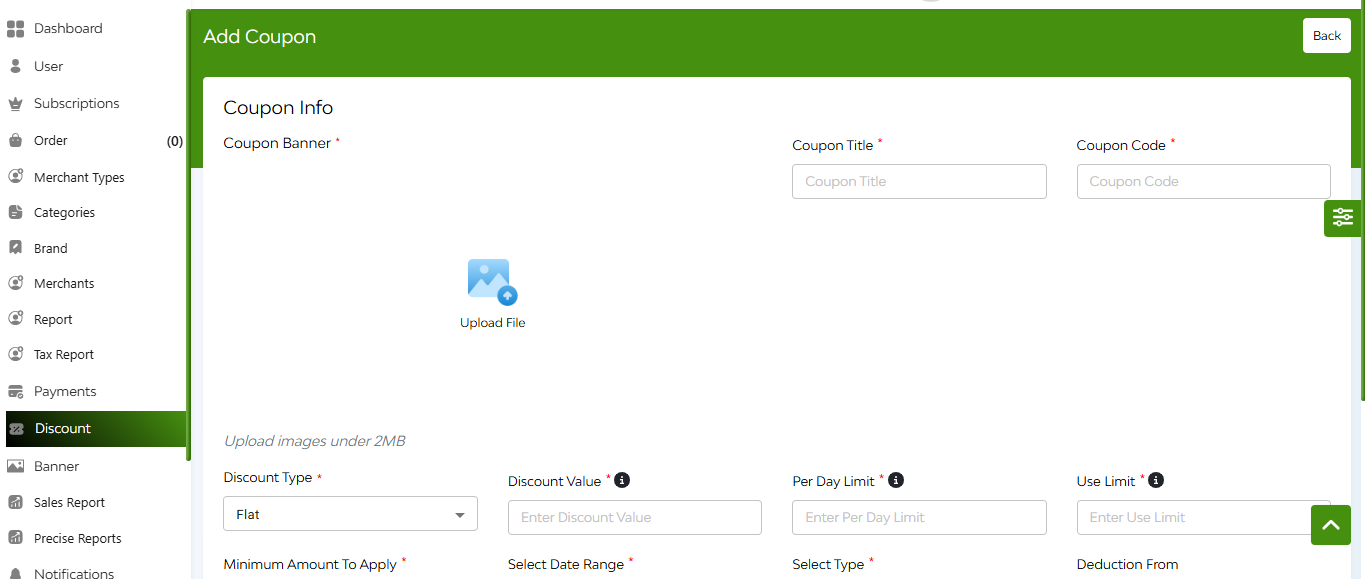
1. Initiate Addition: Click on the ‘Add Coupon’ button located at the top right corner.
2. Enter Coupon Details:

  • Banner: Upload an image representing the coupon.
  • Title: Provide a name for the coupon.
  • Code: Set a unique code that users will apply.
  • Discount Type: (Flat/percentage)
  • Discount Value: The additional amount/percentage that will be discounted for the user.
  • Per Day Limit: Maximum uses per user per day
  • Use Limit: Max no. of times a specific discount or coupon can be used within a timeframe
  • Maximum amount to apply
  • Validity Period: Set the start and end dates.
  • Select Type
  • Deduction form
  • Select Items
  • Description: Add details about the offer.
  • Private coupon

3. Save coupon: Click on the ‘Add’ button to finalize and create the coupon.

FAQ's

  • A Coupon is a code-based discount that users must manually apply during checkout.
  • A Deal is an automatic promotional offer that applies directly to selected items or categories without requiring a code.

To add a coupon:

Go to Discount → Coupons → Add New

Fill in required fields like:

  • Coupon Title & Code
  • Image
  • Discount Type (Flat/Percentage)
  • Value, Maximum Discount
  • User limit, Use limit, and Minimum amount
  • Date Range
  • Applicable user type and deduction (Admin or Merchant)
  • Select applicable items
  • Add description

Save to create the coupon.

If a coupon is marked Private, it won’t appear in the user’s general list of coupons.

Only users who have the coupon code can use it. It is useful for targeted or exclusive promotions.

Yes. When setting a percentage discount, you can define a maximum cap (e.g., 40% up to ₹200 max).

If you don’t want to set a cap, enter 0.

  • If Admin is selected, the platform bears the discount amount.
  • If Merchant is selected, the discount is subtracted from the merchant’s revenue.

This allows flexibility in who sponsors the promotion.

The “Select Type” field defines who can use the coupon.
It can be limited to:

  • All users
  • New users only
  • Specific merchants

This helps with targeted promotions and campaign segmentation.

While creating a coupon, you can select specific items from the product list.

The coupon will then be applicable only to those selected items.

Yes. Use the “Minimum Amount to Apply” field to define the cart value that must be met before a coupon can be applied.

There are two settings:

  • User Limit – defines how much a user must spend to be eligible.
  • Use Limit – defines how many times the coupon can be used in total.

In the Coupon listing section, each row has Edit and Delete buttons under the Actions column.

Use them to modify or remove a coupon anytime.

A Deal is automatically applied on selected products or brands — users don’t need to enter a code.

It is visible as a promotional banner or offer directly on the user side.

Go to Discount → Deals → Add New, then:

  • Upload Deal Banner
  • Enter Deal Title
  • Set Discount Type (Flat/Percentage)
  • Set Discount Value
  • Select Start and End Date
  • Choose Target Type (Product, Brand, Merchant)
  • Assign items
  • Choose deduction type (Admin or Merchant)
  • Add description
  • Save to activate the deal.

Yes. Use the “Reorder” function in the deals listing to prioritize which deals appear first on the user interface.

There’s no system limit from the admin panel — you can create as many deals and coupons as your marketing strategy requires.

Once the end date is reached, the coupon or deal becomes inactive automatically and is no longer usable by the users.

Yes. If you don’t set any restriction in the “Select Type,” the coupon will be available to all users.